JSON API Connector

StartMsg JSON API connection allows you to easily send important data to any external URL you specify. For example, when a chosen activation event occurs, the system automatically sends the JSON format to your specified webhook URL. A response is expected within 10 seconds – if not received, the system will resend the request. This is a great way to integrate StartMsg with other third-party platforms such as Zapier or to create fully customized solutions. The JSON API connection features are easily accessible in the "Messenger Bot" menu section.
Full Connection Management
Using JSON API In addition to creating new connections, you can also monitor activity, edit existing connections or remove connections you no longer need. In this way, you can easily manage the entire process of connecting to external systems, react quickly to changes and adapt the configuration to your needs.
Simple New Connection Creation
To create a new connection, just press "New connector" button and follow a few simple steps:

- Connector Name: Name the connection so that it can be easily identified among others.
- Webhook URL: Enter the URL to which the data will be sent. This URL can be obtained from other applications such as Zapier, or specify the URL of your app. JSON data will be sent to this URL and the system will wait up to 10 seconds for a response.
- Select a Page: This field allows you to select the page connected to the Messenger bot from which you want to collect data.
- Which Field Activates Webhook: Select the field that should trigger the webhook. Options: email, phone number, location, postback, date of birth or webview forms. For example, if you select email, when a new address is collected by the Messenger bot, the webhook is triggered. You can select more than one field if required.
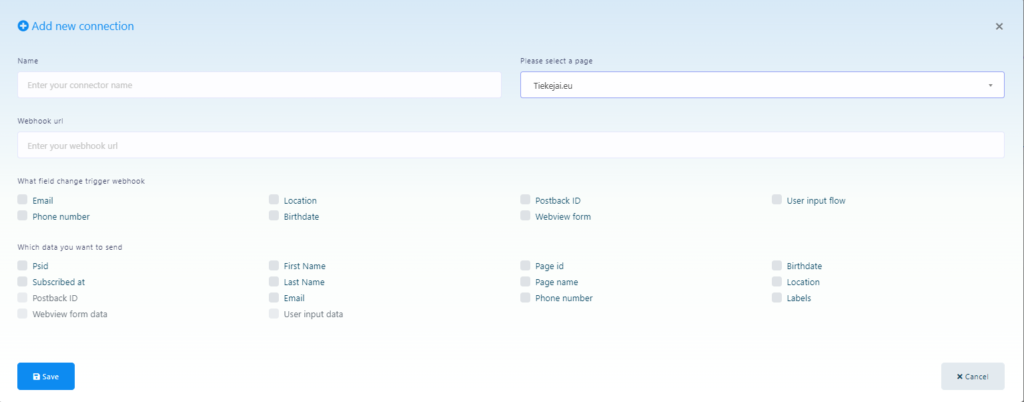
- What Data You Want to Send: Select the information to be sent when the webhook is activated. Example of how the data can look like:
{
"psid": "12765756″,
"first_name": "Test",
"last_name": "User",
„subscribed_at”:”2024-01-15 12:19:04″,
"email": "testuser@gmail.com",
"labels": "Demo,Demo Label 1,new-label-test",
„page_id”:”37674343246″,
"page_name": "Test Page",
„phone_number”:”+370628282846″,
"user_location":"",
"postbackid":"",
„subscriber_id”:”2251324188330310″,
„webview_form_id”:”83c567cd88″,
"product-type": "Shoes",
"Size": "Medium",
"Phone-Number": "88823″,
„Delivery-Date”:”2024-01-15″
}
Clear Connector Reports
You can monitor each connection created via the dashboard. The activity report allows you to see the last 10 actions and basic settings. If the connection is activated successfully, the HTTP code will show "200". In the reports section, you can also see what data was sent during the last activations.
Adding a PHP Script as a Webhook URL
If you want to use your own script to accept JSON data, you can do so by adding your URL as a webhook. For example, if your domain is "https://example.com"and the script is called "test.php", the webhook URL will be "https://example.com/test.php". When the selected activation event occurs, the system sends data to this URL. To receive JSON data, add the following code to your "test.php" file:
$webhook_data = file_get_contents("php://input");
$webhook_data_array = json_decode($webhook_data, true);
Using StartMsg JSON API connectivity, you can not only automate important business operations, but also customise the platform to work with other applications you use.